
Modern OpenGL : Vertex Buffer Objects
Now we'll get to the meat of this OpenGL stuff; we will draw a triangle! Yeah, this sounds a little boring, but it will form the basis of pretty much anything you'll want to do in realtime 3d. At this point, your development environment should be all set up such that you can compile/build/run the source code from the last tutorial ( ogltest.c ). On this page, we'll walk through the VBO code and try to develop an understanding of what is happening.
Initialization
int main()
{
    init();
    loadData();

    ...

    killit(0);
    return 0;
}
This main() function is where everything begins. First we'll be focusing on what happens before the program enters the main game loop (that while(1) loop). First, main calls one of our functions called init().
void init()
{
  if (glfwInit() != GL_TRUE)
    killit(1);

  if (glfwOpenWindow(800, 600, 8, 8, 8, 0, 0, 0, GLFW_WINDOW) != GL_TRUE)
    killit(1);

   glewInit();

  glfwSetWindowTitle("GLFW HelloWorld");

  glMatrixMode(GL_PROJECTION);
  glLoadIdentity();
  float aspectRatio = 600.0f / 800.0f;
  glFrustum(0.5f, -0.5f, -0.5f * aspectRatio, 0.5f * aspectRatio, 1.0f, 50.0f);
  glMatrixMode(GL_MODELVIEW);
}
The init() function is pretty basic. You can see that it just initializes GFLW and creates a window for us. After it sets the window's title, the code builds a Projection Matrix. Shaders (programs on your video card) rely on matrices to turn the geometry data you send them into pretty pictures. The projection matrix is used for the actual conversion of 3d coordinates into 2d screen coordinates. It isn't necessary to understand how this happens yet. For now, think of the projection matrix as your "camera lens". Once init() returns back to main(), the next function: loadData() is called.
void loadData()
{
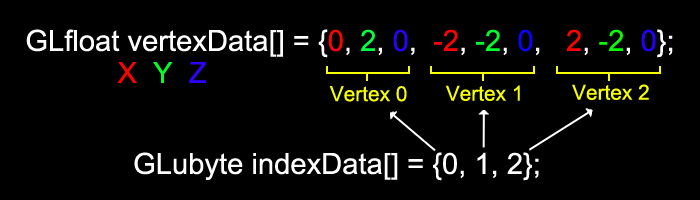
GLfloat vertexData[] = {0, 2, 0, -2, -2, 0, 2, -2, 0};
GLubyte indexData[] = {0, 1, 2};
glGenBuffers(1, &myVBO);
glGenBuffers(1, &myIndices);
glBindBuffer(GL_ARRAY_BUFFER, myVBO);
glBufferData(GL_ARRAY_BUFFER, sizeof(vertexData), vertexData, GL_STATIC_DRAW);
glBindBuffer(GL_ELEMENT_ARRAY_BUFFER, myIndices);
glBufferData(GL_ELEMENT_ARRAY_BUFFER, sizeof(indexData), indexData, GL_STATIC_DRAW);
}
As you may have guessed, this is where we are building the actual geometry that will be displayed on the screen. We need to store coordinates in 3d space for each point of the triangle and then store indices that tell the GPU that these points compromise that triangle. The first thing we do is declare an array of floats and give it the values of all three points (x1,y1,z1, x2,y2,z2, x3,y3,z3). Next we build a small array of bytes that index that data. In this case, there are only three points (0, 1, and 2). However, in other meshes, a single vertex (point) will likely be part of several triangles. By using our indexing array, we can make speed and memory improvements by only defining each vertex once and then pointing to it multiple times for multiple triangles. Right now, these data arrays are only declared locally in this function (they are just sitting in RAM on the stack).
Our next goal is to get the data to the GPU so it can be used later when we actually draw the triangle. The glGenBuffers function tells the GPU to create a fresh VBO for us to store some data in. The myVBO and myIndices variables are used to locate these newly-created arrays on the video card. Next we use the glBindBuffer function to "select" a VBO to fiddle with. First we bind the VBO referenced by the myVBO variable. The glBufferData function is used to transfer our vertex/coordinates data to the VBO. So the data goes from vertexData (in RAM) to myVBO (on the GPU). Finally we bind the myIndices buffer and transfer the data in indexData to it. Now the video card has all of our triangles vertices and indices to those vertices sitting in its memory ready for super-fast usage.

The loadData() function returns back to main() and the program now enters the main game loop.
The Main Game Loop
    while(1)
    {
        if (glfwGetKey(GLFW_KEY_ESC) == GLFW_PRESS)
            break;

        rotZ += 0.5f;

        glClear(GL_COLOR_BUFFER_BIT | GL_DEPTH_BUFFER_BIT);
        drawScene();
        glfwSwapBuffers();
    }
Now that all of the data is in place and sitting on the GPU, it time to start the loop that will determine what the program does for the rest of its life. This is an infinite loop that repeatedly looks for user input (from the keyboard) and draws the triangle on the screen. If the usere presses the escape key, the loop breaks, the program does a little cleanup and exits. Otherwise, the global float variable rotZ has 0.5 added to it and the execution continues. This variable is used to store the current rotation of the triangle as it spins; making it increment more on each iteration of the loop will make the triangle spin faster.
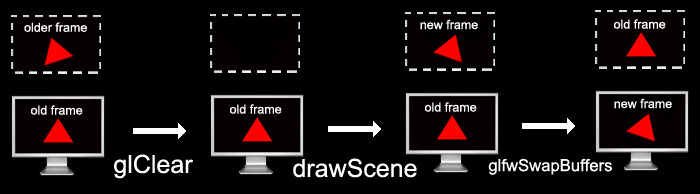
It is a good time to explain what double buffering is. As our program draws a new frame on the screen, we'd like it to update all at once. It wouldn't look very nice if we could literally see each triangle being drawn one at a time during each frame update. Double buffering (also known as backbuffering) to the rescue! GLFW sets this up for us automagically, but its important to be aware of it. Every time we use OpenGL to draw something to the screen, we are actually drawing to a hidden virtual screen. The first step is to clear this virtual screen (wipe it black) using the glClear function. Next we call our custom drawScene() function to actually perform the drawing on this virtual screen. Finally the program calls glfwSwapBuffers(). This takes the actual screen image and swaps it with whatever we've drawn on the virtual screen. This makes the entire new frame draw to the real screen instantly rather than piece-by-piece.
Drawing
void drawScene()
{
    glLoadIdentity();
    glTranslatef(0, 0, -10);
    glRotatef(rotZ, 0, 0, 1);

    glColor3f(1, 0, 0);

    glBindBuffer(GL_ARRAY_BUFFER, myVBO);
    glBindBuffer(GL_ELEMENT_ARRAY_BUFFER, myIndices);

    glEnableVertexAttribArray(0);                                               //ENABLE VERTEX POSITION
    glVertexAttribPointer(0, 3, GL_FLOAT, GL_FALSE, sizeof(float) * 3, 0);      // VERTEX POSITION POINTER

    glDrawElements(GL_TRIANGLES, 3, GL_UNSIGNED_BYTE, 0);
}
Finally, we are ready to draw something. The actual drawing process isn't very exciting, though. We already did most of the work back in the loadData() function. The first few OpenGL calls are used to set up the ModelView Matrix. This is another matrix that is passed the shaders. Its job is to tell the video card where in 3d space the current object is and how it is rotated. It also takes into account the position and orientation of the view ("camera"). We first call glLoadIdentity() to zero out the matrix. This makes the triangles being drawn center on the origin (0, 0, 0) of the world. This is also where our little virtual camera is, so glTranslate is used to push the current triangles in front of the camera by 10 units. Then, the current object is rotate on the z-axis using that global variable rotZ to determine the angle. This is how the spinning happens; that rotZ increments by 0.5 each frame to create the spinning effect. We also set the color that the triangle will be drawn with.
Now we revisit the actual vertex buffer objects. Remember that we've already filled the VBO called myVBO with vertex coordinate data and myIndices with a list of numbers that define the triangle's points. First we select myVBO to be the GPU's current GL_ARRAY_BUFFER and myIndices to be its current GL_ELEMENT_ARRAY_BUFFER. This tells the video card that myIndices is being used to index vertices whose coordinates are defined in myVBO. Next we tell the GPU what kind of data is sitting in the VBO. In this case its the actual positions of the vertices. GL_VERTEX (0) is the default attribute used to feed the shaders xyz position information about vertices. Other examples include color, normals, and texture coordinates. The function glEnableVertexAttribArray is used here to tell the GPU "I have vertex position data for you". Next, glVertexAttribPointer tells the video card where this data can be found. The first argument is 0; this means that the data being described is for GL_VERTEX (position). The second argument, 3, means that we are defining x, y, z. Next comes the datatype (float) and then GL_FALSE which tells OpenGL not to normalize our numbers (just leave them alone). The second-to-last argument is called the stride, it tells the GPU how much data comprises each vertex. The final 0 argument defines how far into the array the data we are drawing begins.
After all of this preparation, we draw the triangles defined in myVBO using glDrawElements. I won't bore you with the arguments of this one because its fairly self-explanatory. However, I will mention that we don't need to specify myVBO or myIndices because we used glBindBuffer earlier to "select" them. Once this drawScene() function returns, the backbuffer that it has been drawing on gets swapped with the screen and displayed. Then the entire game loop runs all over again.
The Fixed Function Pipeline
Throughout this page I've been mentioning terms like "shaders" and "attributes" without fully explaining what I mean. The next installment will go deeper into this sort of thing. Right now, we are not using our own custom shaders to tell the GPU how to draw all of this stuff. At the moment, we simply feed data (like vertex coordinates and matrices) to it and define what kind of data it is. Then we are using glDrawElements to say "go ahead, do your thing". This default drawing method (called the fixed function pipeline in which we trust the GPU to draw all of our stuff is not the preferred method. We used it here so that we could focus on the basics.
The next step is to build two programs which will tell the GPU how to process the data that we feed it to make pretty pictures. The first is called the vertex shader. As the video card iterates through that myVBO buffer reading xyz coordinates, this vertex shader will combine that data with all of our matrices to turn that 3d point into a 2d point on the screen (based on object/view position). It sounds tough now, but we will program this behavior instead of allowing OpenGL to decide how this happens for us. Next, we'll write the fragment shader. After the vertices are processed into 2d points that define the corners of our triangles, the GPU will fill-in the pixels between those points to make the triangles solid. Our fragment shader will define how this happens (full control over every pixel). At the moment, the default behavior along with the glColor function just fill our triangle in with red...we can do much cooler stuff if we write the fragment shader ourselves.